Every entrepreneur who wants to enter the markets of Australia, New Zealand, India, Malaysia, Canada, etc. will come across the GST or Goods and Service Tax. The GST registration process is completely online: no paper copies or physical printouts are required. Let’s talk in more detail about it and understand how to apply online for GST.
What is GST (Goods and Services Tax)?
GST (Goods and Service Tax Identification Number) is a unique taxpayer registration number for supplying goods and services in GST countries.
As of July 1, 2017, any seller who wants to sell goods and services must register for the GST (Goods and Services Tax) unless the seller sells goods or services that fall into an exempt category.
Further, under the GST regime in effect in certain countries, all registered taxpayers will appear in a single platform in each individual country for goods and services tax compliance purposes.
Indeed, registration on such a platform ensures centralized administration.
For some types of businesses, registration under GST is mandatory. If an organization conducts business without registering with GST, it is an offense under GST and is subject to serious penalties.
What business needs GST?
There are many reasons why companies need to register with the GST. Here are some of them.
You must register for GST if:
- Your business has a GST turnover of $75,000 or more;
- Your nonprofit has GST sales of $150,000 or more;
- You provide cab or limousine services (including ride-hailing services such as Uber, GoCatch, Didi or OLA), regardless of your GST turnover;
- You want fuel tax credits for your business, regardless of your GST turnover.
Otherwise, GST registration is optional.
Who may submit for a GST?
- Individuals registered under pre-GST legislation (i.e. excise tax, VAT, service tax, etc.);
- Taxable person / Non-resident taxable person;
- Agents of supplier and distributor of input services;
- Persons paying tax under the reverse charge mechanism;
- A person making deliveries through an e-commerce aggregator;
- Each e-commerce aggregator;
- A person who supplies online information and database access or retrieval services to a person who is not a registered taxable person.
How to apply online for GST?: Step-by-step GST registration process
Step 1: Create a GST application form
The first step is to obtain a Temporary Registration Number (TRN). To do this you will need:
- A valid cell phone number of the country for which you are making the registration;
- Email address;
- Permanent Account Number (PAN).
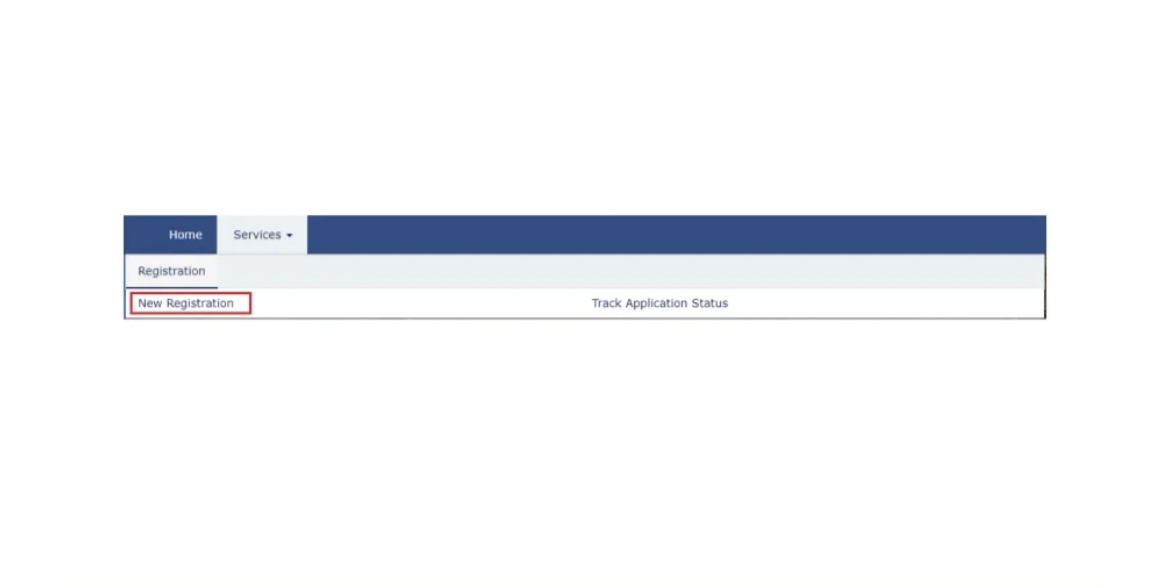
Go to the official GST portal – https://www.gst.gov.in/ and on the services tab select Services > Registration > New Registration.

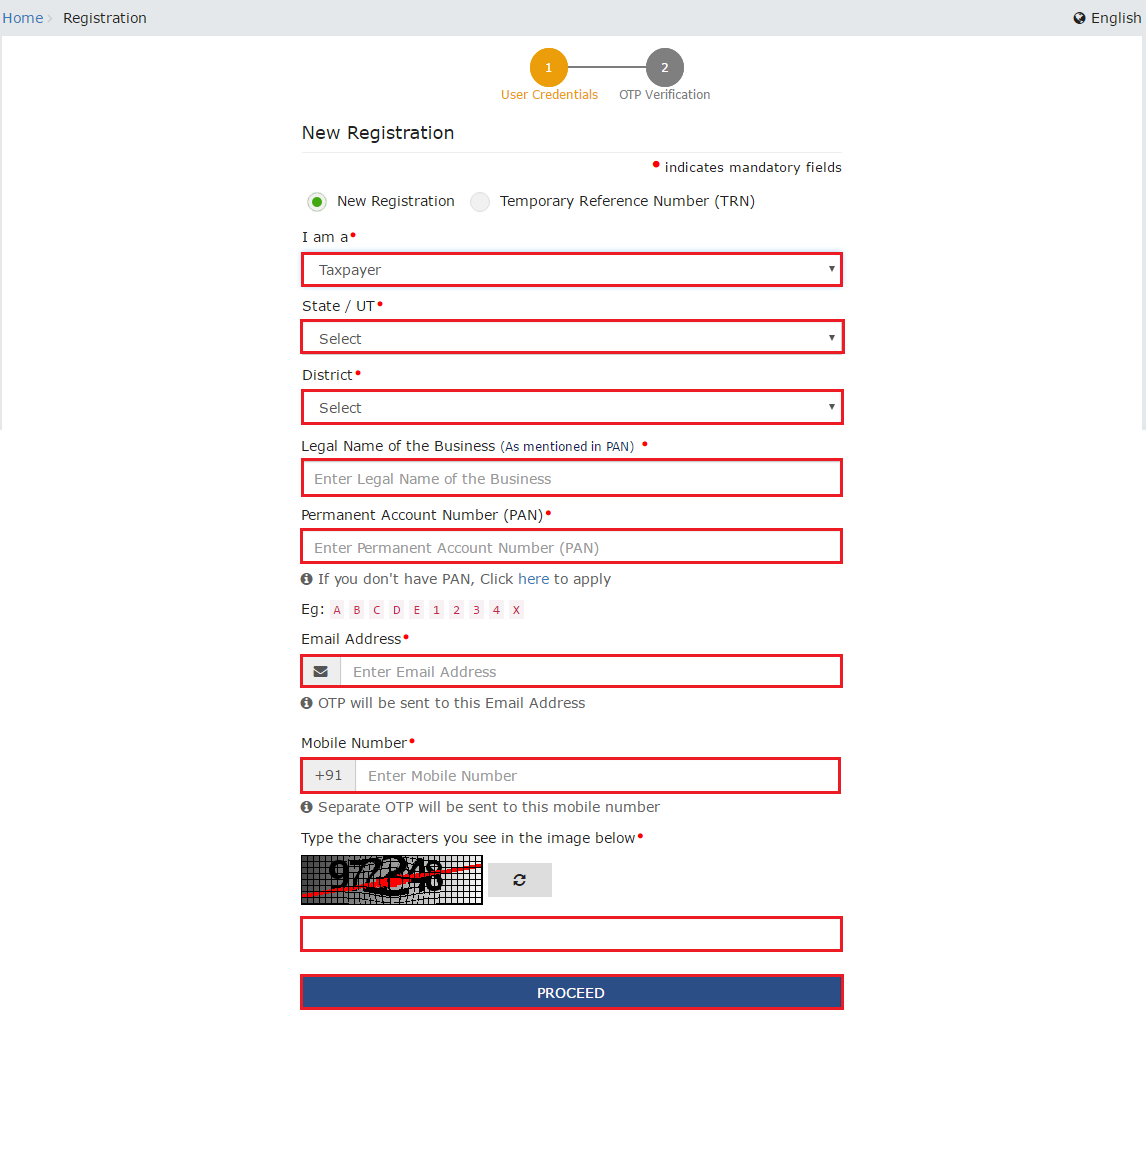
On the registration page, enter all the requested information (including the PAN number), email address and cell phone number.

After entering the data, click Continue. You will receive two different OTPs to your cell phone and email to verify your cell phone number and email address. The OTP is only valid for 10 minutes. However, you can re-generate the OTP if necessary.
At the end of this process, your Temporary Reference Number (TRN) will be generated.
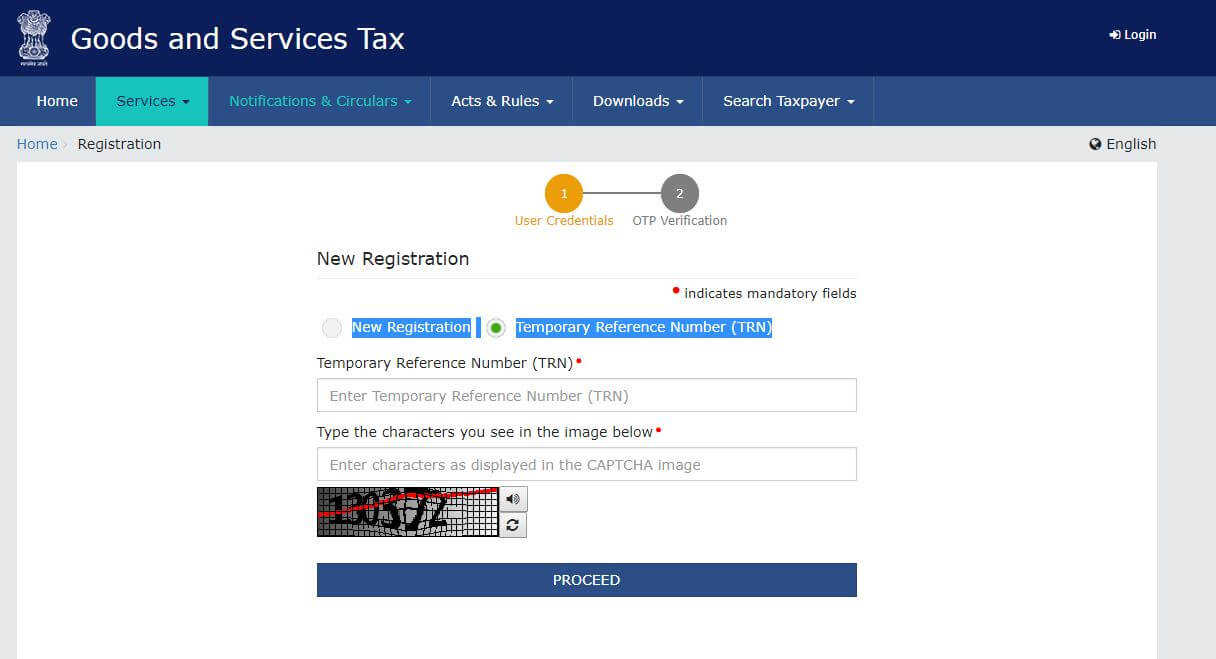
Meanwhile, to use this number, click Proceed or Services > Registration > New Registration and select the Temporary Reference Number (TRN) button to log in with the TRN.
In the Temporary Reference Number field, type the generated TRN and enter the captcha text as shown on the screen.

After that, you will need to confirm the OTP again. However, it will be different from the previous OTP. You will receive it at your cell phone number and email address.
Next, you will go to the My Saved Application page. You will need to fill out all the information on the form and submit it within 15 days. After that, your number and the saved form will be deleted.
Click on the Edit button and go to step two.
Step 2: Fill out the GST application form
The form contains 10 sections/ tabs. Click on each tab to enter that section. Consult with a tax professional/GST practitioner before submitting the form.

For this process, you will need scanned copies of the following documents and some additional personal information:
- A valid bank account number and IFSC
- Proof of business registration
- A partnership agreement (if available)
- For others, a Certificate of Incorporation of the business organization.
- Proof of principal place of business
- Photo of founder, director, partner, Hindu Undivided Family (HUF) member (whichever is applicable)
- Proof of designation of an authorized person
- Photo of authorized person
- First page of bank book / statement showing bank account number, branch address, address of account holder and recent transaction details.
Steps to follow. If you are logged out, you can log in again using your TRN number from the previous section:
- Fill out all the tabs, following the instructions on the slides above. Click the Save & Continue button to save all the information you have filled in.
- Add the Business and Promoters / Partners tabs with at least the required fields that have been highlighted. Make sure you provide proof of business creation.
- Fill in the Authorized Signatory information. Note that if you want to sign the form with an electronic signature, the Authorized Signatory’s mobile/email address will be used. If you want to sign the form with DSC, your Authorized Signatory’s PAN must be associated with DSC.
Further instructions on how to complete the remaining tabs, such as the Primary place for business, the Goods and services tab, and the Bank accounts tab.

Step 3: Digital Signature Certificate registration
In order to verify your GST application, you will need to digitally sign the form.
You can only register and use the digital signature of the authorized person listed on the GST registration form.
Make sure you have the DSC software installed on your computer.
If you want the DSC, you can go to any of the certification centers listed on http://www.cca.gov.in/cca/.
After installing the DSC software, you must also have the DSC Dongle (which you will receive with the DSC software) with you.
To sign the GST form, you also need to install the Emsigner software. You can download and install the DSC Signer software from emsigner.com.
Step 5: Verifying and applying for GST
You can apply by choosing any of three verification methods:
- First, verification by DSC
- Secondly, using an electronic signature
- Thirdly, verification with EVC
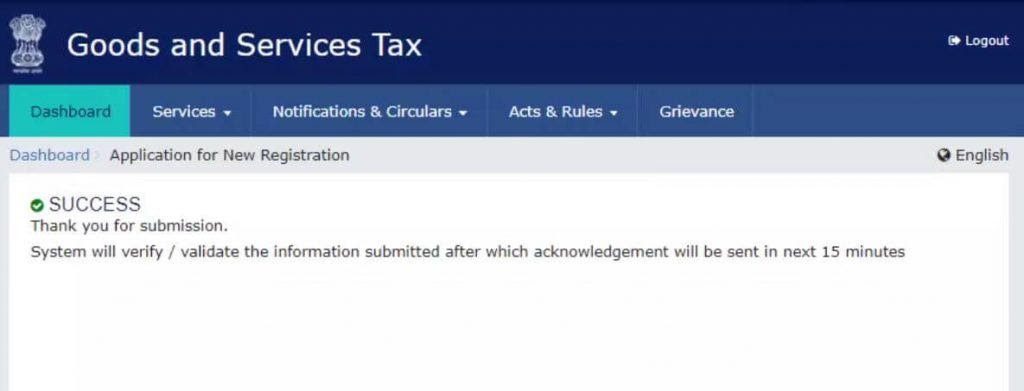
Once completed, you will get an Application Reference Number (ARN) to your cell phone number and email address. You can use it to track the status of your application (Services > Registration > Track Application).
As soon as your application status lights up, you will receive an email and SMS notifying you that your GSTIN has been created, along with a temporary username (which will be your GSTIN number) and a password to access the GST Web site.
And when logging into the GST portal using the temporary username and password you received, you will need to go to the home page and then click on the First time login option, which will be available at the bottom of the login page. After you enter the temporary username and password provided to you and click on Enter, you will need to change your username and password for future use
You will be able to download your registration certificate within 3-5 days. To download your registration certificate, log in with your valid credentials at www.gst.gov.in to access your control panel, go to Services > User Services > View or Download Certificates and click Download.
Final thoughts
Admittedly, the registration procedure differs from country to country, but everywhere it is simple and fast. Timing of receipt varies from 1 to 12 days, depending on the quality of all documents provided.
All forms and applications can be submitted online or with the help of specialists.
Eventually, to apply correctly and get a GST number quickly, you need to be well-versed in the requirements of a particular country, especially in the list of required information.
For example, in India, to get a GST number the following information is required: PAN number, Indian bank account number, completed forms for registration as GST payer, details of an authorized person who must be resident in India with a valid PAN number, information about the ongoing business (type of business, location, turnover) and contact details.
Thus, in Australia, to obtain a GST number, you will need to provide all similar taxpayer information as well as an ABN number. You can apply for an ABN and GST at the same time.
Want more insights like this? Subscribe to Amaz.Markets and stay tuned for all the updates!
0


